supporting scissor skills
why do scissor skills matter?
Scissor skills are a double-whammy.
Not only are they great for helping kids feel competent and confident when cutting in the classroom.
But, which each snip, they also help kids strengthen the muscles involved in holding a pencil.
This is why you get more-bang-for-your-buck every time your students participate in a cutting activity. But, unfortunately, snipping is not always smooth sailing for every child. So let’s take a closer look so we can support students when cutting doesn’t come so easily.
when cutting with scissors is challenging
If a cutting is not going so smoothly for a student, you might notice:
a dislike or avoidance of cutting tasks
an awkward grasp of a scissors
difficulty staying on the lines
jagged edges on shapes
tearing or ripping the paper
awkward body position when cutting
excessive trimming of shapes
frequent requests for assistance
sticking out or moving tongue when cutting
No worries. Some direct instruction and practice will help. And luckily, teaching scissor skills is pretty simple and straightforward.
getting ready to learn to cut with scissors
Just like when learning how to hold a pencil, there are some readiness skills that contribute to a student’s success with scissor skills:
There are three basic things that you can take a look at before you even begin to teach a student how to cut with scissors:
hand dominance: does your student have a preferred hand they consistently use when eating, writing, or coloring? I encourage them to call this hand the “boss” hand and the non-dominant hand the “helper” hand.
finger isolation and identification: a student should be able to identify they have a thumb, index, tall, ring, and pinky finger and can isolate the movement of each one, even slightly, before you start telling them where to put them on the pencil.
hand strength: do you notice signs of hand weakness, such as frequent dropping of materials, difficulty opening food containers, requests for help with clothing fasteners, markers or glue sticks being left uncapped, or struggles with small manipulatives such as legos? If so, start with some simple hand strengthening activities (download a free guide to hand strengthening here).
how to teach a child to cut with scissors
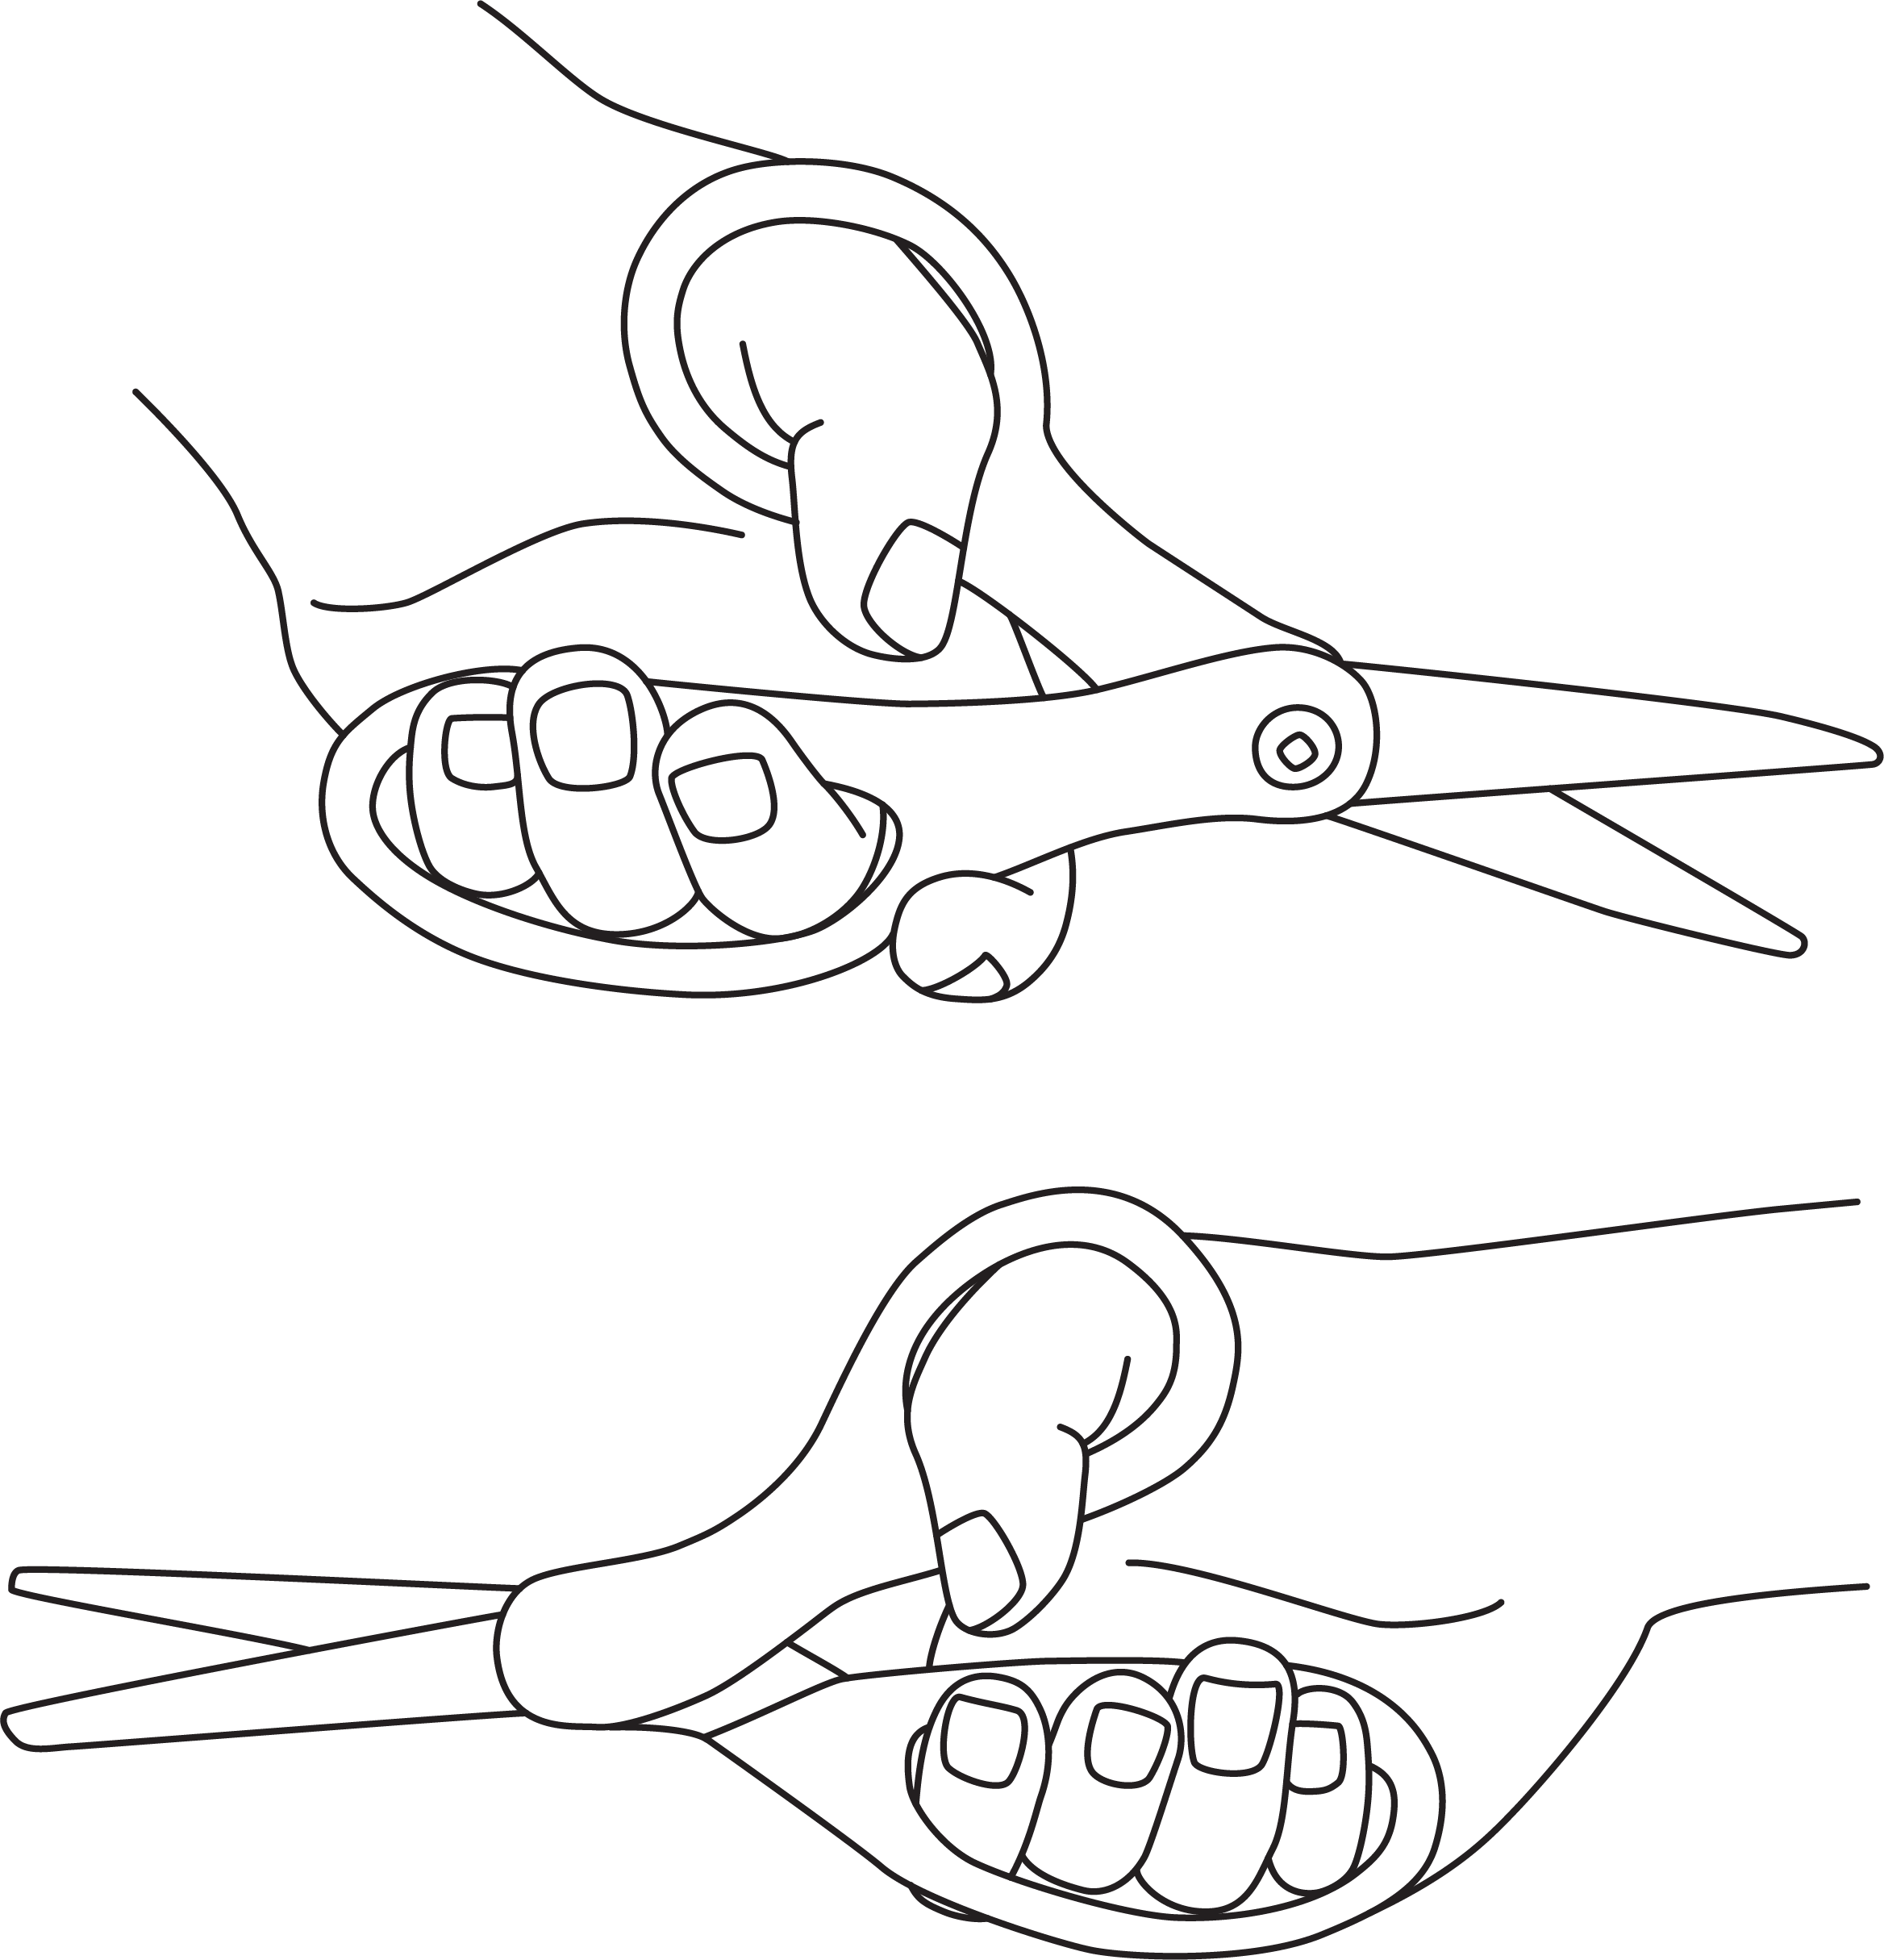
Before you even start, have your student look at the scissors and notice what they see. Most school scissors have one smaller loop for the thumb, and a larger loop for the fingers. Make sure your student can look at the scissors and notice the difference between the smaller thumb loop and the larger finger loop.
A word about finger placement - as you would guess, the thumb goes in the thumb loop! Easy peasy! As for the finger loop, there are a couple of variations on finger placement. Ideally, the index finger is placed in front of the finger loop as a guide and the remaining fingers are placed in the finger loop. This finger placement is difficult for some students, so an alternative is placing the index finger in the finger loop.
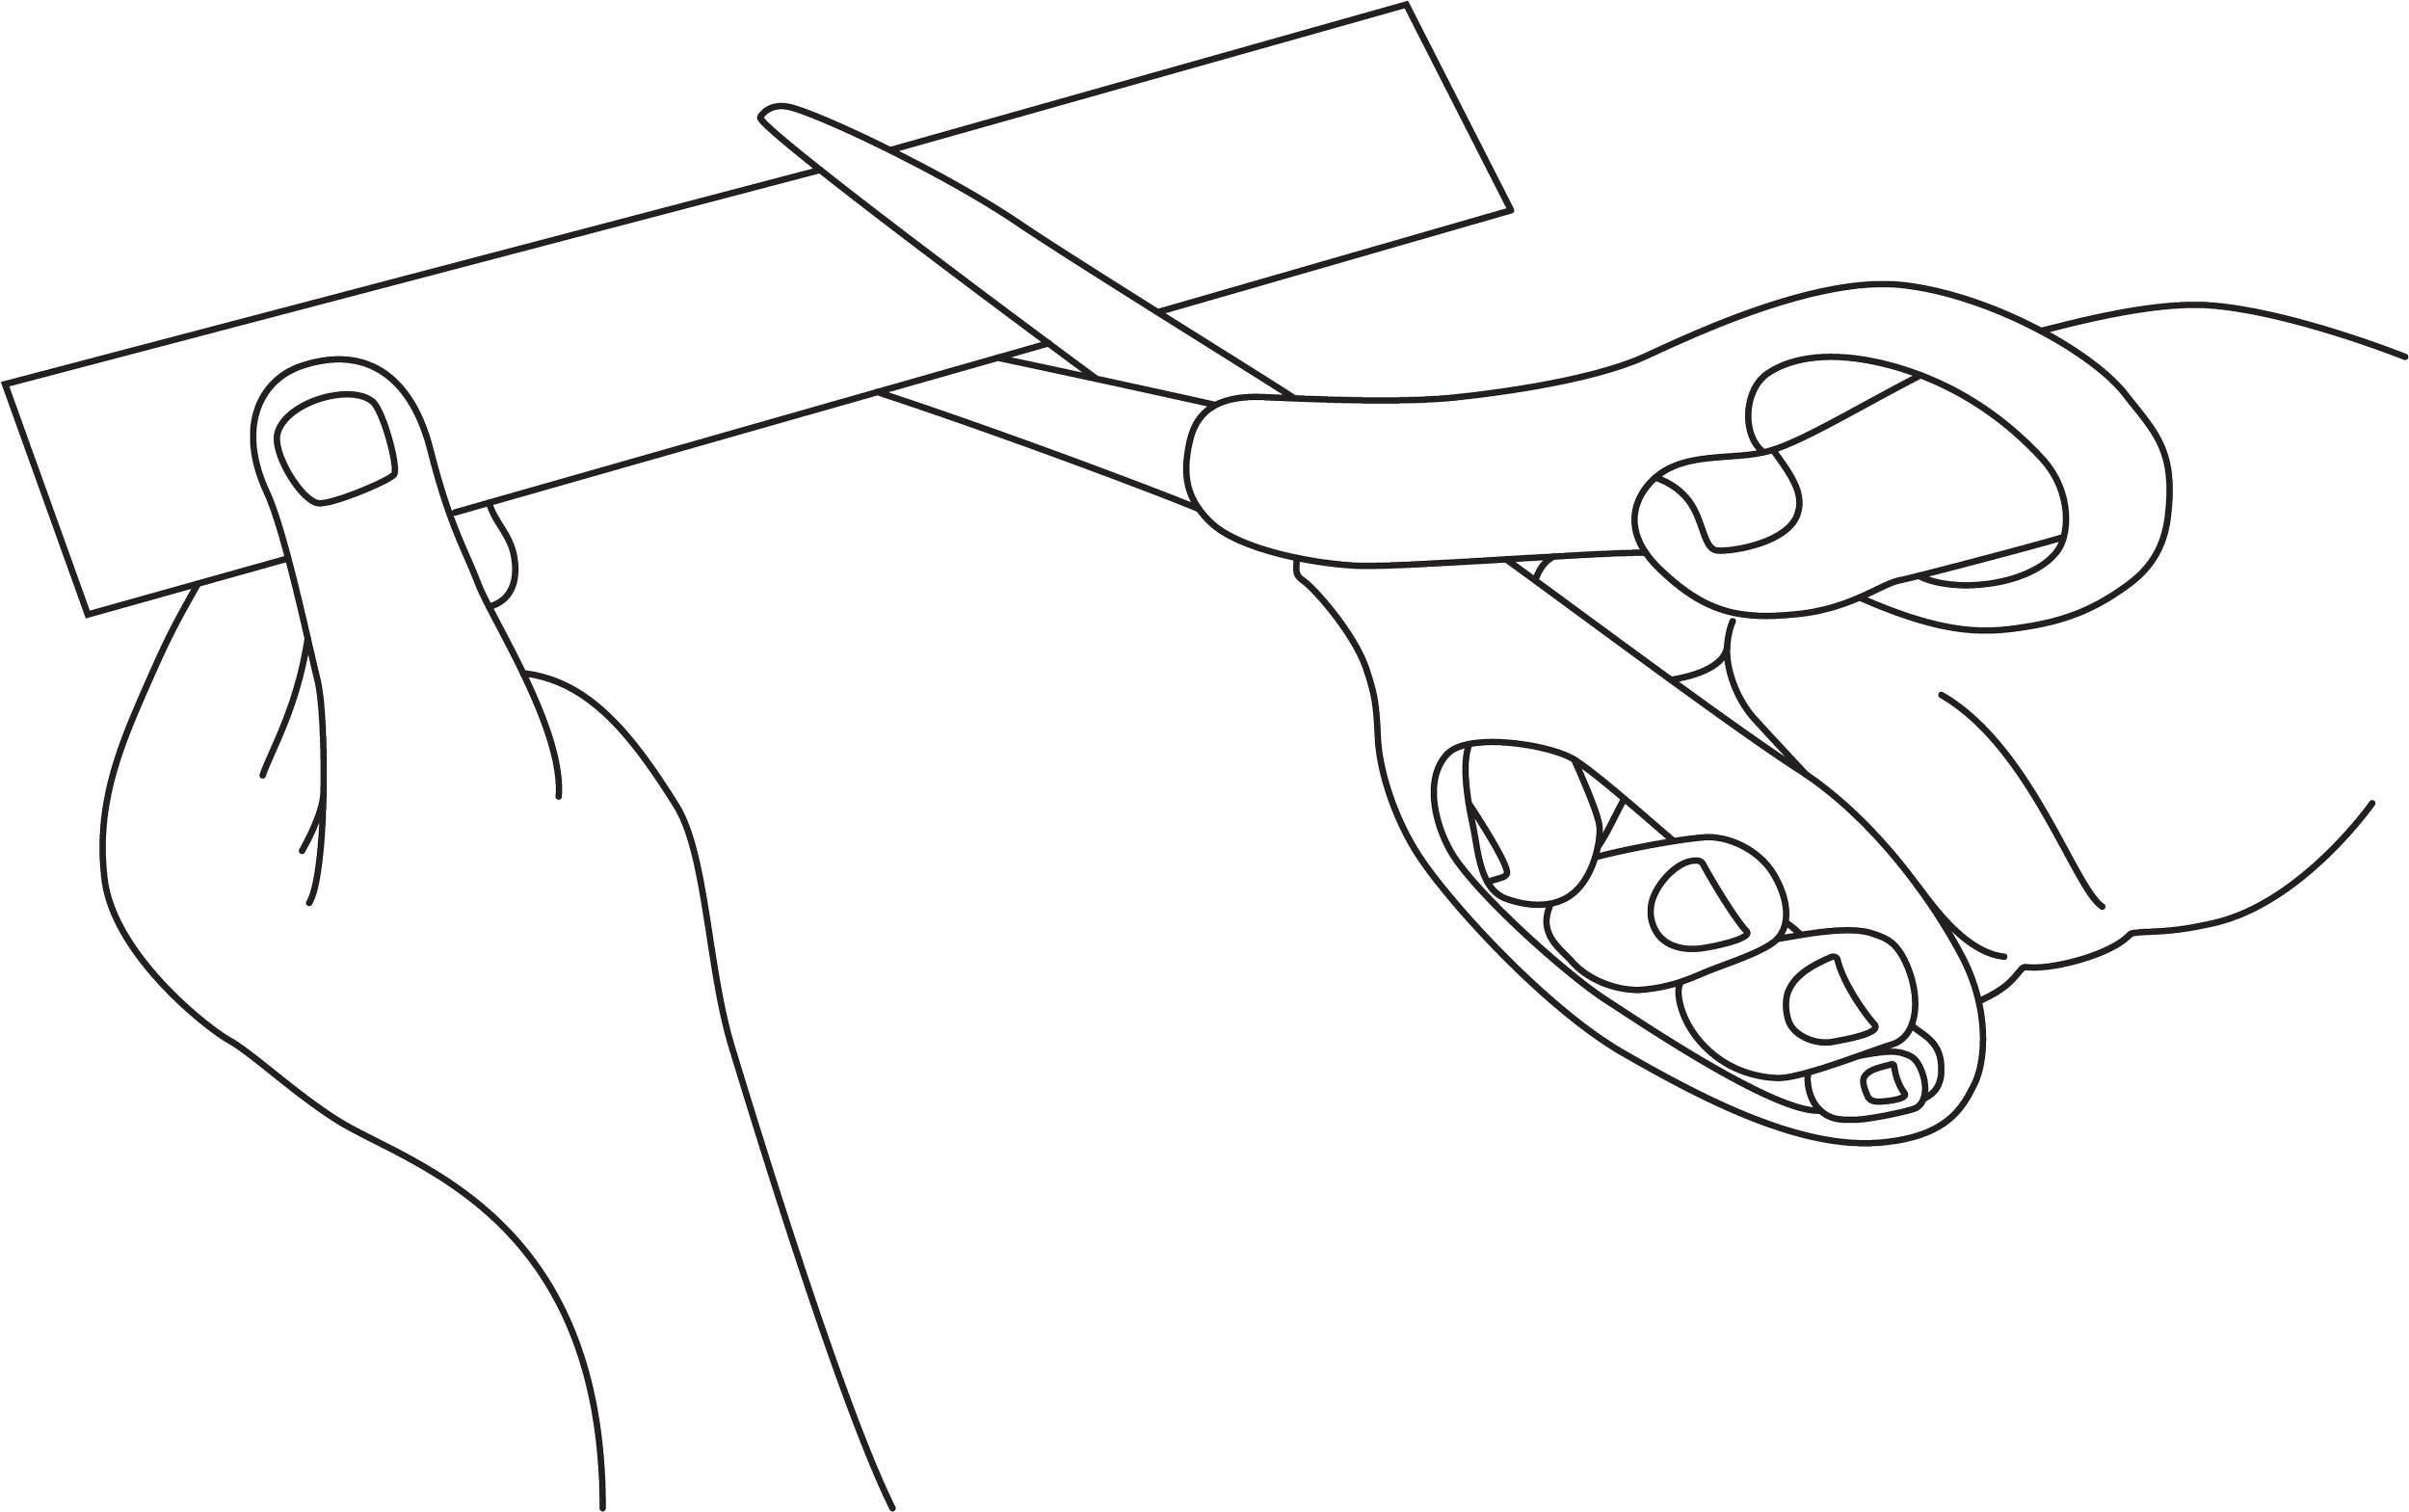
Now you are ready to teach the three simple steps of cutting and prompt your student to practice them each time they cut:
THUMBS UP: always hold the scissors with your thumb pointed up
HELPER HAND HOLDS: the helper hand holds and adjusts the paper as needed
OPEN AND SQUEEZE: hand muscles open and squeeze to snip
And those are the cues your students should hear consistently during cutting activities in order to internalize them. My students might think I am a broken record (if they know what records are!) because they can be sure they will hear from me, “Time to cut! Remember, thumbs up, helper hand holds, then open and squeeze!” Because this plan has become so familiar to them, I can often hear them quietly talking themselves through each step as they set themselves up.
from snips to shapes
Just as cutting skills progress developmentally, so should the cutting tasks presented. Sometimes our expectation is way too high, which can lead to frustration. So here are some basic guidelines for introducing cutting tasks:
For children just learning to cut, snipping is where it is at.
Start with 1” wide strips of paper, which will need only one full squeeze of the scissors in order to produce a snip. And watching those snips sprinkle down onto the table is so reinforcing, it motivates kids to keep snip, snip, snipping!
Progress to 1 1/2” wide strips, and then 2” strips, which will require two consecutive squeezes of the scissors to produce a snip. I think snipping is so reinforcing for children who are new to scissors that I keep a large empty jar to fill up with all the snips. Watching the jar fill up is wildly exciting to kids and provides a wonderful incentive to keep snipping!
Once your students have mastered snipping, the next task would be to cut a 6” piece of paper in half, and then to work on cutting along a 6” line. After that, you can introduce simple shapes such as a 3” square. Last but not least, introduce the circle.
The reason shapes are more challenging, is that the helper hand has to do more coordinated maneuvering in order to cut a shape. For example, when cutting a square, the helper hand has to rotate the paper several times for the scissor to cut along each side.
The circle is the most challenging, because the helper hand has to perform a smooth, steady, constant rotation of the paper as the scissor cuts. This is kind of like a pat-your-head-and-rub-your-belly challenge, where both hands have to be performing completely different actions in a coordinated manner at the exact same time. No wonder some of our students struggle with this.
One more thing to think about when considering the difficulty of a cutting task is the thickness of the paper. The thicker the paper, the more challenging it is to cut, so this is another variable to keep in mind when presenting cutting tasks.
other cutting considerations
There are a few other important things I want to mention about cutting:
Lefties: Left handed students truly do benefit from using a good pair of left handed scissors. The blades are reversed on left handed scissors allowing lefties to better see the cutting line. This really reduces frustration for lefty cutters. It’s a small investment that has a huge return.
Jammers: The most common scissor grasp problem I come across on a daily basis is jamming. Some kids jam their hands so far into the holes of the scissors that there is barely any freedom of movement to open and squeeze their hand in order to cut. The solution is usually as simple as making them aware that they are jamming, and to show them how to hold the scissors closer to their fingertips. I call this a “loosey-goosey” grasp of a scissors, and I use the prompt “loosey-goosey” to remind them to lighten up a bit when I see them return to their jamming ways.
Safety: Last, but definitely not least, I want to speak to scissor safety. Who didn’t grow up hearing the cautionary words, “Don’t run with scissors?” I think we all do a great job of showing kids how to transport scissors, so I am not even going to mention that here. But I can share a couple of additional safety tips I find to be helpful.
First of all, I always tell my students that the scissors has a “parking spot” on their desk, and, for some students, I actually give them a visual cue of a scissors parking spot. That way I can prompt students to park their scissors when needed, which is the quickest way that I have found to redirect students to pause their scissors when they are not being used appropriately.
Secondly, I just want to reiterate that learning to cut can be truly challenging for some students and their frustration is real. Before I offer any additional instruction or assistance to a child who is frustrated by a cutting task, I encourage them to take a well-deserved break to regroup. Offering assistance to a frustrated child who is holding a sharp object is never a great idea in my opinion. The best choice when a student is frustrated is to encourage them to park their scissors and take a break. This will give you a moment to take a step back to consider whether the tasks meets the student at the level they are currently at and how it could possibly be modified if needed.
If you have other questions or concerns regarding cutting with scissors, please reach out! I would love to hear what you are thinking and help you problem solve any other scissor scenarios that I have not mentioned here!

